Recovering Data
This post is a quick run down of a lightning talk that I gave at my local information security meetup.
Introduction
Tonight we are going recovering deleted files from a USB thumb drive. Since I’m a fan of Kali linux, all the tools demonstrated come pre-installed and can be used from a booting off a live CD or USB Thumb drive.
Image the drive
First of all I like to image the drive so that I’m not working on the original source.
This can be helpful if you can’t keep the source device.
When imaging the drive we can use GNU dd, however there are a couple of forks of dd that
have added features for computer forensics. These are dc3dd and dcflddd, tonight I will use the later.
$ dcfldd --help
Usage: dcfldd [OPTION]...
Copy a file, converting and formatting according to the options.

  bs=BYTES                 force ibs=BYTES and obs=BYTES
  cbs=BYTES                convert BYTES bytes at a time
  conv=KEYWORDS            convert the file as per the comma separated keyword list
  count=BLOCKS             copy only BLOCKS input blocks
  ibs=BYTES                read BYTES bytes at a time
  if=FILE                  read from FILE instead of stdin
  obs=BYTES                write BYTES bytes at a time
  of=FILE                  write to FILE instead of stdout
                            NOTE: of=FILE may be used several times to write
                                  output to multiple files simultaneously
  of:=COMMAND              exec and write output to process COMMAND
  seek=BLOCKS              skip BLOCKS obs-sized blocks at start of output
  skip=BLOCKS              skip BLOCKS ibs-sized blocks at start of input
  pattern=HEX              use the specified binary pattern as input
  textpattern=TEXT         use repeating TEXT as input
  errlog=FILE              send error messages to FILE as well as stderr
  hashwindow=BYTES         perform a hash on every BYTES amount of data
  hash=NAME                either md5, sha1, sha256, sha384 or sha512
                             default algorithm is md5. To select multiple
                             algorithms to run simultaneously enter the names
                             in a comma separated list
  hashlog=FILE             send MD5 hash output to FILE instead of stderr
                             if you are using multiple hash algorithms you
                             can send each to a separate file using the
                             convention ALGORITHMlog=FILE, for example
                             md5log=FILE1, sha1log=FILE2, etc.
  hashlog:=COMMAND         exec and write hashlog to process COMMAND
                             ALGORITHMlog:=COMMAND also works in the same fashion
  hashconv=[before|after]  perform the hashing before or after the conversions
  hashformat=FORMAT        display each hashwindow according to FORMAT
                             the hash format mini-language is described below
  totalhashformat=FORMAT   display the total hash value according to FORMAT
  status=[on|off]          display a continual status message on stderr
                             default state is "on"
  statusinterval=N         update the status message every N blocks
                             default value is 256
  sizeprobe=[if|of]        determine the size of the input or output file
                             for use with status messages. (this option
                             gives you a percentage indicator)
                             WARNING: do not use this option against a
                                      tape device.
  split=BYTES              write every BYTES amount of data to a new file
                             This operation applies to any of=FILE that follows
  splitformat=TEXT         the file extension format for split operation.
                             you may use any number of 'a' or 'n' in any combo
                             the default format is "nnn"
                             NOTE: The split and splitformat options take effect
                                  only for output files specified AFTER these
                                  options appear in the command line.  Likewise,
                                  you may specify these several times for
                                  for different output files within the same
                                  command line. you may use as many digits in
                                  any combination you would like.
                                  (e.g. "anaannnaana" would be valid, but
                                  quite insane)
  vf=FILE                  verify that FILE matches the specified input
  verifylog=FILE           send verify results to FILE instead of stderr
  verifylog:=COMMAND       exec and write verify results to process COMMAND

    --help           display this help and exit
    --version        output version information and exit

The structure of of FORMAT may contain any valid text and special variables.
The built-in variables are used the following format: #variable_name#
To pass FORMAT strings to the program from a command line, it may be
necessary to surround your FORMAT strings with "quotes."
The built-in variables are listed below:

  window_start    The beginning byte offset of the hashwindow
  window_end      The ending byte offset of the hashwindow
  block_start     The beginning block (by input blocksize) of the window
  block_end       The ending block (by input blocksize) of the hash window
  hash            The hash value
  algorithm       The name of the hash algorithm

For example, the default FORMAT for hashformat and totalhashformat are:
   hashformat="#window_start# - #window_end#: #hash#"
   totalhashformat="Total (#algorithm#): #hash#"

The FORMAT structure accepts the following escape codes:
  \n   Newline
  \t   Tab
  \r   Carriage return
  \\   Insert the '\' character
  ##   Insert the '#' character as text, not a variable

BLOCKS and BYTES may be followed by the following multiplicative suffixes:
xM M, c 1, w 2, b 512, kD 1000, k 1024, MD 1,000,000, M 1,048,576,
GD 1,000,000,000, G 1,073,741,824, and so on for T, P, E, Z, Y.
Each KEYWORD may be:

  ascii     from EBCDIC to ASCII
  ebcdic    from ASCII to EBCDIC
  ibm       from ASCII to alternated EBCDIC
  block     pad newline-terminated records with spaces to cbs-size
  unblock   replace trailing spaces in cbs-size records with newline
  lcase     change upper case to lower case
  notrunc   do not truncate the output file
  ucase     change lower case to upper case
  swab      swap every pair of input bytes
  noerror   continue after read errors
  sync      pad every input block with NULs to ibs-size; when used
            with block or unblock, pad with spaces rather than NULs

Report bugs to <nicholasharbour@yahoo.com>.
As I’m running low on disk space I am going to save the drive image to an external drive. This may also come in handy if you are booting from removeable media.
For now I’m only going to use the if and of arguments.
dcfldd if=<source device> of=<target image>
NOTE: it is important to get the source and target around the right way as you have the potential to distory data!
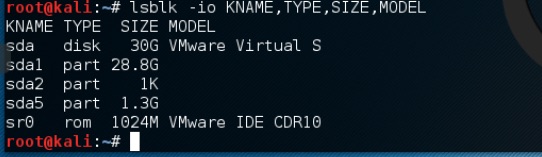
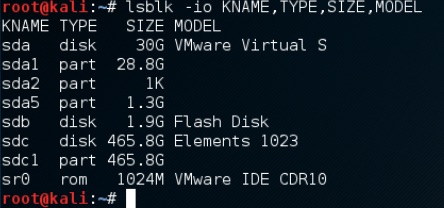
A handy way to see what drives you connected is to use the lsblk command.
lsblk -io KNAME,TYPE,SIZE,MODEL
now lets image the drive
$ dcfldd if=/dev/sdb of=/media/root/ELEMENTS/isig.img

Recovering the files
Now we have an image file it is time to carve out the files from it. Kali has both foremost
and scalpel installed. While the authors of foremost recommend using scalpel,
I have had the most sucess with foremost out of the box.
$ foremost -h
foremost version 1.5.7 by Jesse Kornblum, Kris Kendall, and Nick Mikus.
$ foremost [-v|-V|-h|-T|-Q|-q|-a|-w-d] [-t <type>] [-s <blocks>] [-k <size>]
	[-b <size>] [-c <file>] [-o <dir>] [-i <file]

-V  - display copyright information and exit
-t  - specify file type.  (-t jpeg,pdf ...)
-d  - turn on indirect block detection (for UNIX file-systems)
-i  - specify input file (default is stdin)
-a  - Write all headers, perform no error detection (corrupted files)
-w  - Only write the audit file, do not write any detected files to the disk
-o  - set output directory (defaults to output)
-c  - set configuration file to use (defaults to foremost.conf)
-q  - enables quick mode. Search are performed on 512 byte boundaries.
-Q  - enables quiet mode. Suppress output messages.
-v  - verbose mode. Logs all messages to screen
The options that we are going to use:
-t allto carve out as many files as possible-vverbose output-in isig.imgthe drive image to process-o foremostthe directory to place the found files
$ foremost -t all -v -in isig.img -o foremost
After some time the files will be carved out into the foremost directory. Lets have a look what is in there.
$ tree foremost/
foremost/
├── audit.txt
├── docx
│   └── 00106328.docx
├── exe
│   ├── 00107944.exe
│   └── 00129456.exe
├── gif
│   ├── 00111088.gif
  ...
└── png
    ├── 00118384.png
    ├── 00127448.png
    ├── 00128384.png
    ├── 00129920.png
    ├── 00131136.png
    └── 00143742.png
Now we can compare that to the original USB thumb drive.
$ tree /media/root/HOT
HOT
├── 00018664.exe
├── 2011 AHOT TK_v3.pdf
├── Chapter Handbook
│   ├── A.Preface.pdf
│   ├── B. Charter.pdf
│   ├── C.Officer Positions.pdf
│   ├── D.Benefits.pdf
│   ├── E.Activities.pdf
│   ├── F.Chapter Business.pdf
│   ├── G.Annual Meeting.pdf
│   ├── H.Marketing Media.pdf
│   ├── I.Safe Riding Tips.pdf
│   ├── J. State Rallies.pdf
│   ├── K.Reference Docs.pdf
│   ├── L.Index.pdf
│   ├── Opening Pages.pdf
│   └── Table of contents.pdf
├── forensicsT1C1.jpg
├── forensicsT1C2.img
├── key.txt
└── shadow
We see that 00106328.docx has been recovered. The recovered files both present and deleted are carved out and given an unique number. Sometimes you get double ups and fragments,
it depends on how the files are written to disk and calculated without the aid of the File Allocation Table.